Trail Fxs V2
TRAIL FXs v2 | Getting Started
TRAIL FXs v2 | Getting Started Part 2
TRAIL FXs v1 | DOCUMENTATION
In this simple documentation, I’ll show you how to get started with Trail FXs.
WATCH THE GETTING STARTED WITH TRAIL FXs
Once you purchase the pack, you will receive a .zip file containing .blend files and other assets library files.
Installing to Assets Library
Extract the purchased .zip file and place the extracted folder somewhere you keep your assets.
Now in Blender,
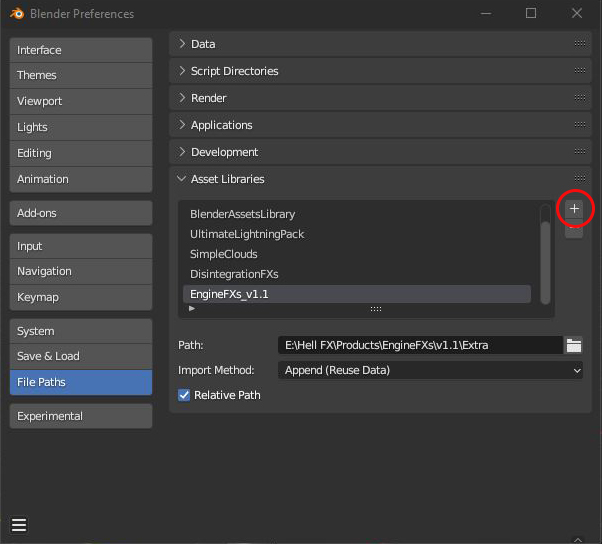
Go to Edit>Preferences and under File Paths you will see an option to add new assets libraries to Blender.


Now you have added the new Trail FXs to your assets library.

You can now open a new window in Blender and change it to Assets Browser to see the full Assets Pack!

Blade References
To create a blade trailing effect,
first, you need to create a reference for Blade.
For that, you can duplicate the edges of your blade and separate it to a new object.

This new object is parented to the right-hand bone(using a child of constraint) of the character rig just like the sword. So that it will move with the animation.
Blade trailing Effect
Now Drag and drop Trail_Blade into the scene.
In the modifiers tab select the blade reference we created as the Trail Reference.

Now when you play the animation you will see your trail.
Play with the modifier controls to change the effect.
Blade Trail Materials
To use other provided materials, Drag and drop them into the blade trail.

Then select it from the material input in the effect modifier.

Further Control of the Material Effect
To change the material parameters head over to the material tab and you will see your material in there.Now under custom properties, you will see more sliders to tweak the material to get the exact look you desire.
Once you are happy with the effect Don’t forget to Bake the Simulation.
And that’s a simple introduction to Trail FXs!


