Quick Project
What is it?
When modeling 3D objects, getting vertices to lie flat against the surface is a common situation. While you can do this in Blender, you need to come out of Edit mode and go to modifiers. While this is all well and good and gives you the opportunity to "live" follow the surface of an object. But sometimes you just need to move verts to where you want them.
Quick project is a simple and useful modeling tool that projects selected verts down onto the surface of an object. It can be a different object, or it can be the same object that has the source vertices selected. Quick and simple for when you just need to align a few verts to a surface.
If you need to align the bottom of a railing post to a floor or need to align a handle to a vehicle door? Then you can use Quick Project.
UI

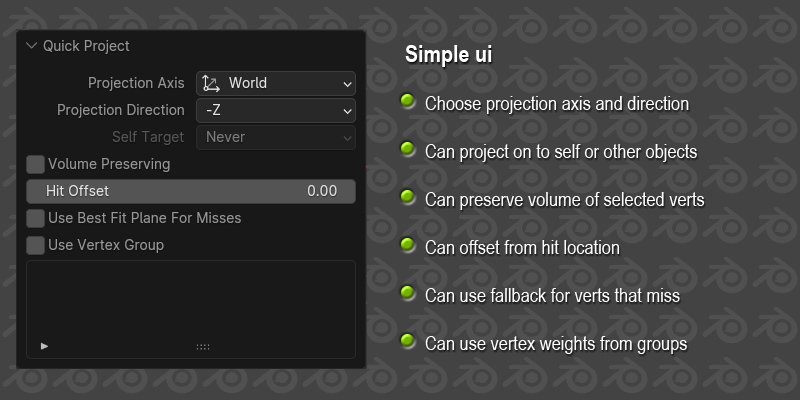
Projection Axis
Which axis-set to use for projection. Choose from “world”, “cursor”, “view”,“active”, “normal” or “local normal”.
Projection Direction
The axis of the chosen axis-set to project in. Choose from X, Y or Z in both negative and positive directions. If the Axis-set is set to “normal” or “local normal”, then direction can only be “positive” or “negative”. This is because the other two axes from the normal may point in strange directions depending on the orientation of the normal, and it can be quite unpredictable.
Self Target
When multiple objects are selected as targets then you can choose to skip over any hits on the source object and only target the other selected objects. Or you can choose to use the source object as a target before or after all other targets.
Hit Offset
Distance from the actual hit to move the vertex. It can be a positive or negative number.
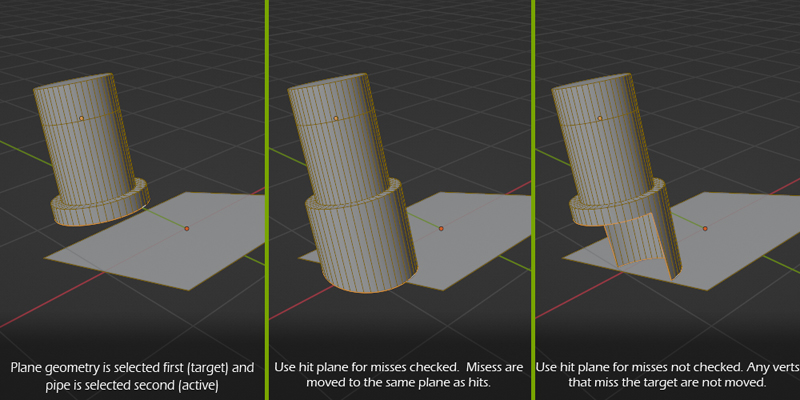
Use Best Fit Plane For Misses
When you are projecting verts it’s quite possible that some verts may just miss all the target objects. That might be fine, or may introduce odd-looking geometry. This option attempts to find the nearest valid vertex hit and use the same hit result information for the vert that misses.
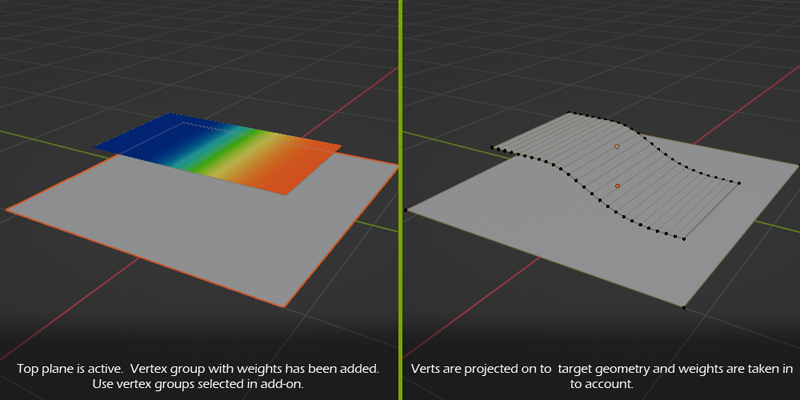
Use Vertex Group
If the active object has any vertex groups, they will be displayed in the list. Tick the option to use groups and then select a group. The add-on will then only use the verts in the group as projection verts. One benefit to this is that it will also use any vertex weights that have been applied to the group. Use this to smoothly transition from one position to another.
How to use
Simply select one or more vertices/edges/faces and then choose a direction to project in. If there are any faces of the mesh in the way, then the vertices will project down onto it.
If you have only one mesh selected and in edit mode, then vertices will only project down onto that object itself. If you want to use other objects as projection targets, then select those first, then select the object you wish to move the vertices of, and then enter edit mode. The active object is always the one that gets modified, and the selected objects are always the targets.
Some examples

This example shows you what will happen when using the “Best fit plane” feature. Verts that miss the collision object completely can still be moved to a sensible place.

This shows how you can smoothly move the averts to a target surface by using vertex groups and weights.

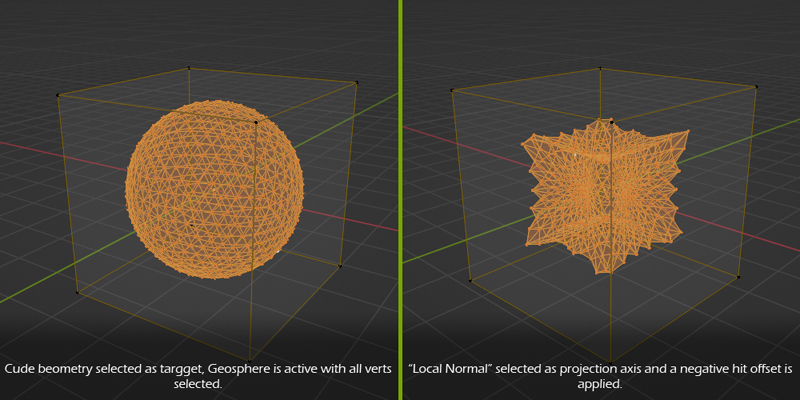
Use "Local normal" as the direction to get each vertex to use it's own normal for the projection direction. This allows you to shrink wrap a mesh on to another.
Version Info
- 1.0.0 Initial release.
- 1.0.1 Fixed divide by zero error when using volume preserve on flat selection
Documentation and help
If you would like to read the documentation, then please visit here.
If you have questions/bugs/suggestions, please contact me here


