Multibrush: Multiple Layer Paint Tool
DOCUMENTATION
This plugin works on Blender's Texture Paint mode in the 3D viewport, here you paint directly on the mesh by Projection Painting.
On the 3D Viewport, once in Texture Paint mode, the plugin will appear on the TOOLS Panel when it is installed:
Press the UPDATE button to load all materials in your project, shown in the next picture inside an orange box.
This plugin extends Blender's built-in Texture Paint mode, designed to help us paint directly over our meshes. Once you have created your mesh, laid out its UV Map you can modify the image with Texture Paint mode:
In Texture Paint mode a pre-loaded Image or procedural texture can be selected on the 'Texture' (1) tab to use as your brush pattern. Note that in order to use it with Multibrush, you must have a placeholder material defined (2) , and the 'Painting Mode' defined using the Material and Texture slots (3).
MultiBrush lets you select a material to be used for your Brush pattern, that is, it will match all texture layers on the Brush material with each corresponding layers on the selected object's material:
Create a material to be used as your Brush matching the texture brushes with the Texture Slots.
Note: It is not advisable to paint a brush for the normal map if you plan to rotate the brush, the normal's colors (Surface orientation) would be distorted. To see how to create a normalmap from your painted heightmap, take a look at MultiBrush' tutorial.
It is not necessary to have the Brush Material applied to any mesh anywhere; it must only be defined and saved purposely:
 Save your brush material by pressing the F button: Save data-block
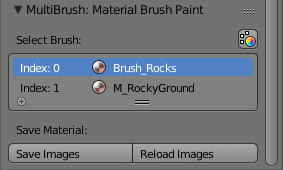
The list of materials laid out on Multibrush panel correspond to all materials created in your project. The brushes that you will use to paint over the material's images are created the same way as any material. Select the material you wish to use as a brush on this list:
 Select a 'brush material' to paint over a mesh
This plugin extends the Projection Paint on Blender, remember to select Material as the Painting Mode on the Slots tab in TOOLs Panel to paint over the images in the selected object material:
 Select Painting Mode: Material to paint over the material's images.
Now that everything is covered, you can start painting with MultiBrush by pressing Alt-LeftClic over the mesh on the 3D viewport, your mouse will draw a projection unto the UV Map of the active object, but this time, each of its texture layers will be painted at the same time!
Compatibility:
Multibrush is compatible with the following features:
Brush Mapping:
View Plane
Tiled
3D
Stencil
Random
Angle
User
Rake
Random
Offset
Size
Stroke Method:
Dots
Space
Spacing
Save / Reload Images
Once you are satisfied with the resulting Material you can save all of its images with the Save button at the bottom of the MultiBrush panel and reload all the images to the file from disk with the Reload Button:
Next: Tutorial
To see exactly how to prepare your object and vizualize the results with a displacement map created exclusively with a heightmap painted at the same time as the diffuse, take a look at MultiBrush tutorial:
http://onlogika.com/visuals/multibrush/
Known Limitations:
-Paint a brush stroke over the mesh on 3D viewport before start using the MultiBrush tool, Blender crashes with no advice if there is no brush information generated firsthand in its blendfile.
-The Undo history considers each paint on each layer as a separate step, you could draw a lot of strokes on a single mouse clic and drag but each undo step will only erase one paint by one. Save and Reload, and paint short strokes to ease this limitation.


