Image Batch Automation
Image Batch Automation addon (works on windows only).
With this Blender addon you can easily batch import 3D object one by one into Blender and then render them out automatically in many different angles in an preset lightning environment. It is also possible to automatically add material to the imported objects (if such information is available). The output is rendered pictures in png format and also a blend file for each imported 3D object. It works for booth Eevee and Cycles.
Included with the addon is:
- The addon script "Image Batch Automation" for windows
- A preset lightning environment.
- Test files to easily test and see how it works.
Who is it for?
This is an addon* for those who want to easily import multiple individual 3D objects into a fully lighted environment and then render them out individually at several different angles. It supports .obj, .fbx .stl, .abc(Alembic), .usd, .usda and .usdc only one format at time**. (It will also work for .3ds files if you install support for 3ds import***)
*will only work in Windows and not for Linux or OS
** if the addons finds .obj first it will only import .obj file, if it find .fbx first it will only import fbx files and so on.
*** 3ds support see: https://github.com/blender/blender-addons-contrib/tree/master/io_scene_3ds
How to use
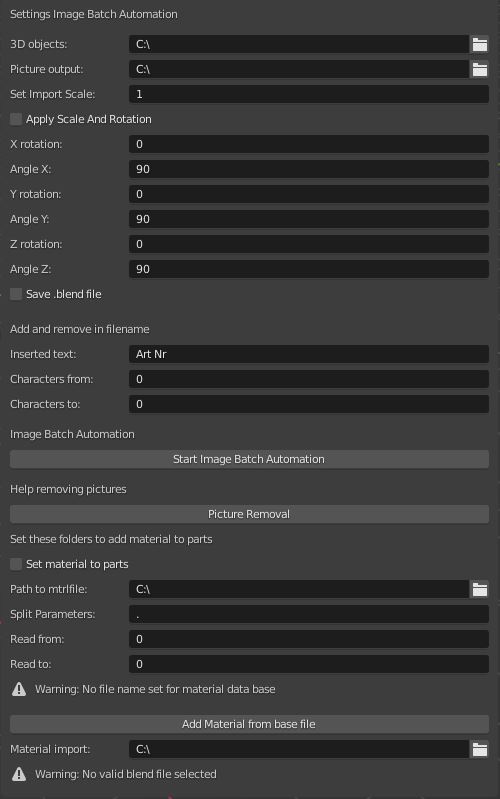
1. 3D objects - Set the folder where the 3D objects are located
2. Picture output - Set the folder where you want the rendered pictures to be saved
3. Set Import scale - Here is the possiblite to scale down or up the imported objects
(Very usefull since if it is to big you will only get a black picture)
4. Apply Scale and Rotation - If selected it will apply scale and rotation on imported object/objects
5. X rotation - Set how many times the objects should be rotated in x axis
6. Angle X - Set how big angle it should be rotated each time in degrees.
7. Do the same for Y and Z as above.
8. Press "Start Image Batch Automation"
Optional:
Save .blend file - If selected you will get a .blend file for each imported object
Inserted text - Add text here if something is needed like for example art nr.
Characters from - Characters from position X is included (0 = all is used)
Characters to - Characters to position Y - the rest is excluded
Picture Removal - After the "Batch Image" is done it is possible to easily remove unwanted pictures in a structured way.
Set material to parts (objects) - Click this and if the information below is added the objects gets new materials when imported to the Blender scene.
Path to mtrlfile - Select what files that holds the information about the materials
Read from - Reads from position X in the objects name in the material file, (0 = all is used)
Read to - Reads to position Y in the objects name in the material file
Add Material from base file - When pressed it imports the material from the file below.
Material import - Set the blend file that holds the material that you want to import material from.
When the script is run and is done it has created one new folder for each new view for every new rotation.
It is now possible to look in the first folder and remove all pictures that you don't want to keep. After using "Picture Removal" the picture you kept in the first folder will be deleted in the next folder. In the next folder keep deleting picture that you don't want to keep. Repeat the same step as before and in folder 3 you will only have the picture left that you still don't have found any good ones on yet.
The idee is that when you are done you only have got one good picture of each imported 3D object. Of Course you can skip this and keep all the pictures.
Also it is possible to set material when the 3D objects are imported. For this you need a blend file with material to import and also a txt file that will tell what material each object will have.
(The function works, but you will need to do this files yourself). It is also possible with the last button to import material from another blend file to this file. When the file is used in the script it is automatically import the materials from this file.
The addon is located under the Misc folder.
More about the Mtrlfile
For your own object you need to make the mtrlfile yourself. See Documentation & FAQ for more information about it. You can also use the addon "Simple Material Replacement" (it is for sale on Blendermarket: https://www.blendermarket.com/products/simple-material-replacement)
Updates:
Ver 1.1.00 - Added "Set Import Scale" option. Since if the imported objcet is to big you will only get a black picture.
Ver 1.2.00 - It is now possible to choose if you want to save a .blend file or not.
Ver 1.3.00 - It is now possible import 3ds files also. But you need to install support for importeing .3ds files from here:
https://github.com/blender/blender-addons-contrib/tree/master/io_scene_3ds
Ver 1.4.00 - It is now possible to select to apply rotation and scale on imported object.
Ver 1.5.00 - For Blender 3.1 and Blender 3.2
Ver 1.6.00 - Added support for import of .abc(Alembic), .usd, .usda and .usdc
Ver 1.9.00 - Added support for import of .glb and .gltf


