Dt-00007 - Hr-Fabric Materials Pro42

Real and 3D professional fabric creations
DT-00007 - HR-Fabric Materials PRO42 (HR MINIPACK) which is extracted from the package "HR 1167 PRO Hyper Realistic Fabric Material Pack" is a hyper-realistic mini-set of textile materials for Blender with great realism even in the micro details (version 2.5) of the fabric, and with 42 READY-TO-USE textile materials, with many customizations. It includes a panel (DFT Color Panel V1.1) that allows real-time color editing of each thread/color that makes up the design of each material.
This textile material pack for Blender has been crafted with a keen eye on industrial reality. Each material has been created by replicating the authentic production techniques used in the textile industry, particularly for Jacquard fabrics. This means that each material corresponds exactly to how it would have been woven in reality. The result? An accuracy so high that it’s almost impossible to distinguish our virtual materials from their real-life counterparts.
Our hyper-realistic textile materials are not mere reworked scans, as is often the case with most fabrics you find online. On the contrary, our materials are digitally created using a proprietary technology that we have specifically developed. This allows us to save time and offers a high degree of customization.
Each material is taken from our collection of real fabrics, designed and created by us for the textile industry.
All the master textures that make up our textile materials are high resolution, ensuring high quality detail even at close zoom. The variety and type of fabrics available make them suitable for most needs and purposes, from making clothes, pillows, curtains and carpets, to scarves, sofas and any other textile application, just like in reality.
To achieve the best visual results, including micro details with high levels of camera zoom, we recommend using scenes with a resolution (if 16:9) of 3840x2160 pixels. However, if you don’t need particularly close shots, a resolution of 1920x1080 will be more than enough to achieve excellent results.
IMPORTANT: Our customization system for various attributes and characteristics of fabrics is extremely useful during the definition phase of the desired fabric specifications. However, it is not designed to be used during the development of a 3D project in production. Given the high quality of the starting textures and the complexity of the calculations required to manage real-time customizations, we recommend baking each material for use in 3D productions. This is unless you have powerful workstations with at least 32 gigabytes of dedicated memory for the GPU.
Each material is already optimized for the Eevee and Cycles rendering engines. However, to achieve the best results with Eevee, it is recommended not to use Dynamic Reflections. These have been specifically designed for use with the Cycles rendering engine.
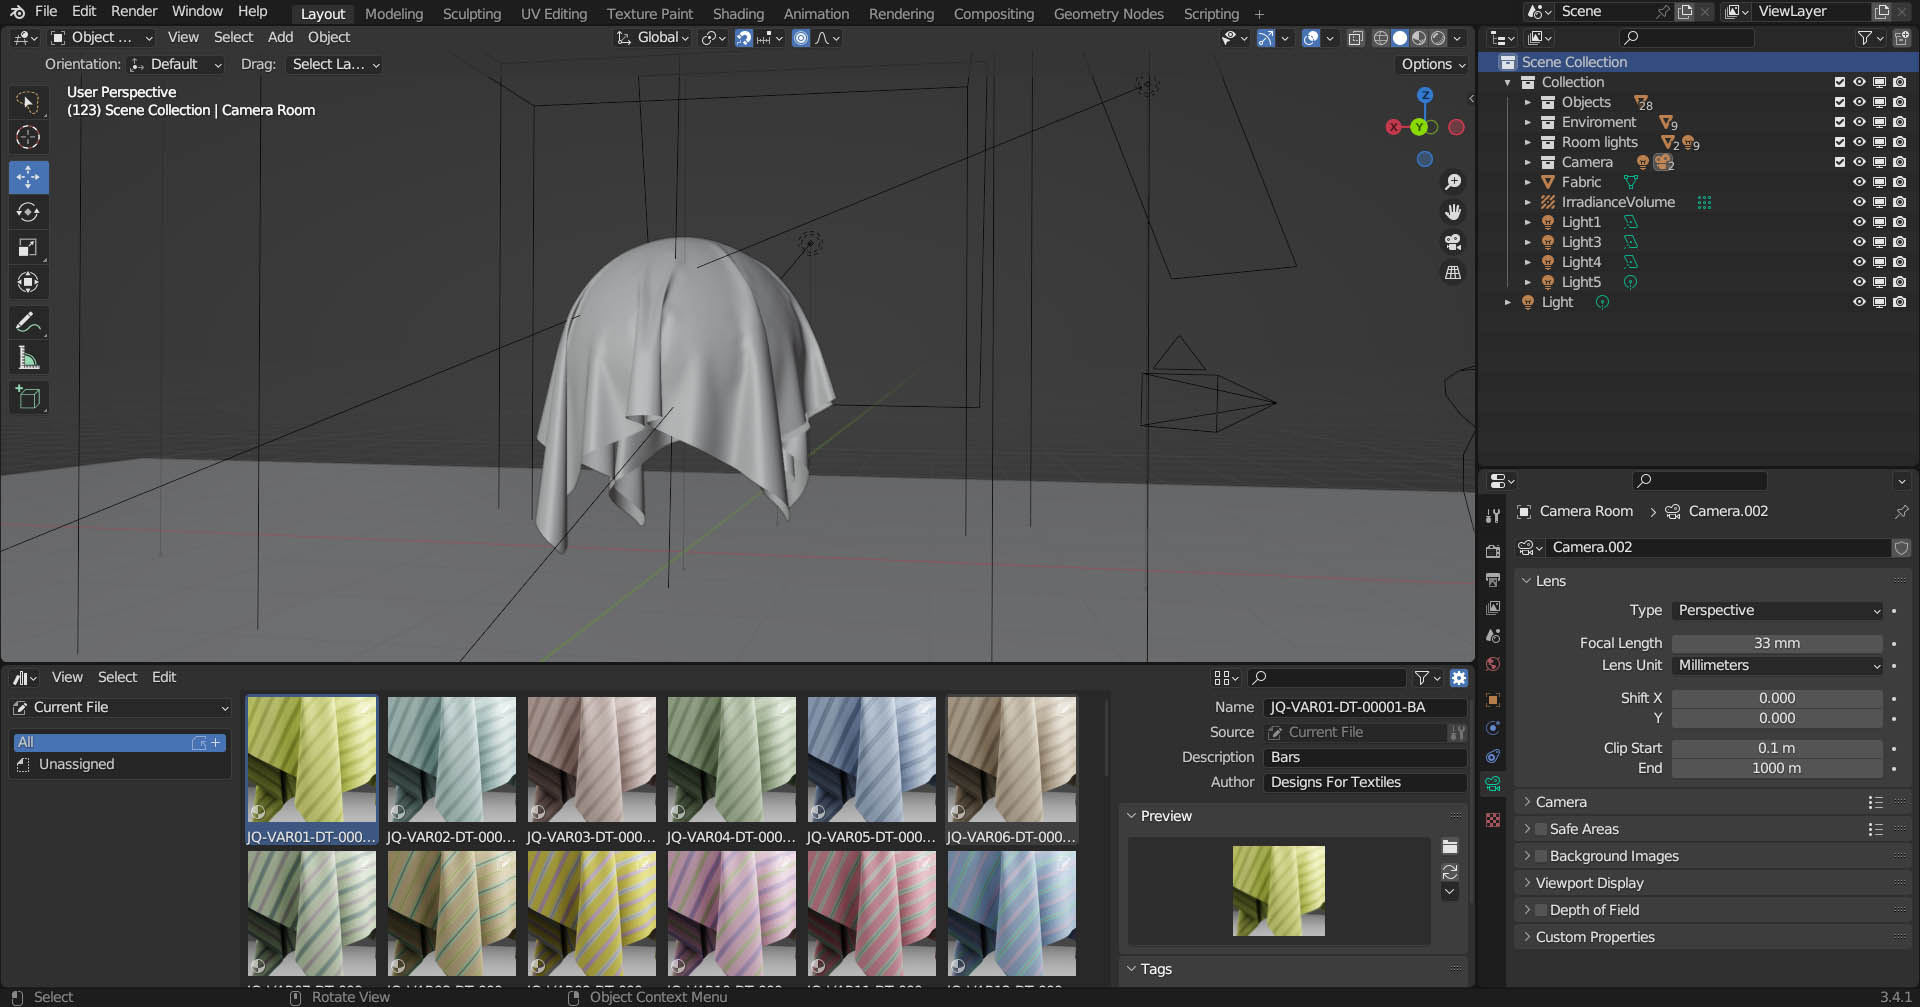
The package contains a blender project with all materials ready for immediate use and two scenes for test materials
|
|
GENERAL FEATURES
The series of HR MINIPACK packages each contain 42 textile meterials of a specific type (pattern) of fabric with color variations, and also some special pattern modifications in some elements.
The contained textile materials are made with DFT 2.5 technology, developed by Designs For textiles, which adds hyper realism even in the micro details of the simulated fabric.
By hyper realism even in the micro details, we mean that the realism of the fabric also appears in large zoom, being able to see even in macroscopic form the realistic weave of each individual thread that makes up the fabric.
All the textile materials in this collection are on the design and feature side, recreated with the same techniques that are used to create real fabrics, and therefore are NOT mere scans, as is the case in all other textile collections around.
From this it follows that much more customization is possible in each of the textile materials, compared to the technique of scans from real fabrics.
The materials have been optimized for use with the Eevee and Cycles rendering engines, although Eevee has some realism limitations that do not allow it to achieve the results achievable with Cycles, and in particular the use of the Displacement Map is only functional in Cycles.
Important: The example videos are indicative of the type of effect not the design.
CUSTOMIZATION
Colors
Each material is characterized by a variety of colors, each of which can be modified independently. Generally, each color corresponds to a ‘micro’ detail of the design. This color customization mode allows you to create ‘infinite’ different color combinations for each individual material.
The customization of each individual color is possible thanks to two types of panels. The DFT Color Panel V1.1, located in the 3D viewport editor and callable in the sidebar, allows you to change each color using Blender’s standard color wheel system. In addition, thanks to specifically created specific bars, it is possible to modify Hue, Saturation, Value, Bright and Contrast for each color.

You can also modify colors through the attribute panel located in the classic property panel under ‘material properties’. Here you can modify the general value of the entire material’s bright, contrast, Hue, Saturation and Value for even more detailed customization.
AO MAP (Ambiente occlusion)
Each material offers the possibility of modifying the application intensity of the AO map, thus allowing to vary the micro shadows of the micro details of the surface of the various textile models.
Although all materials are already preset to achieve the best and most realistic visual rendering, it is possible to modify their intensity at will according to your needs. The AO intensity can be conveniently modified using the two bars ‘AO Intensity 1’ and ‘AO Intensity 2’.
Each material offers the possibility to modify the amount of fabric roughness, based on a roughness map specific to each material. Although each material is already preset to achieve the best visual rendering, it is possible to modify its intensity at will according to your needs.
The intensity of this parameter can be easily modified using the ‘Roughness Intensity’ bar.
NORMAL MAP
In each material, you can modify the intensity of the normal map to precisely adjust the appearance of depth. Each material is already preset with a normal map for the best visual rendering, but you can modify its intensity at will according to your needs.
Generally, for a balanced and realistic result, it is advisable not to exceed values of 1. However, you can experiment with higher values for more particular effects.
The intensity can be modified using the ‘Normal Intensity’ bar.
DISPLACEMENT MAP
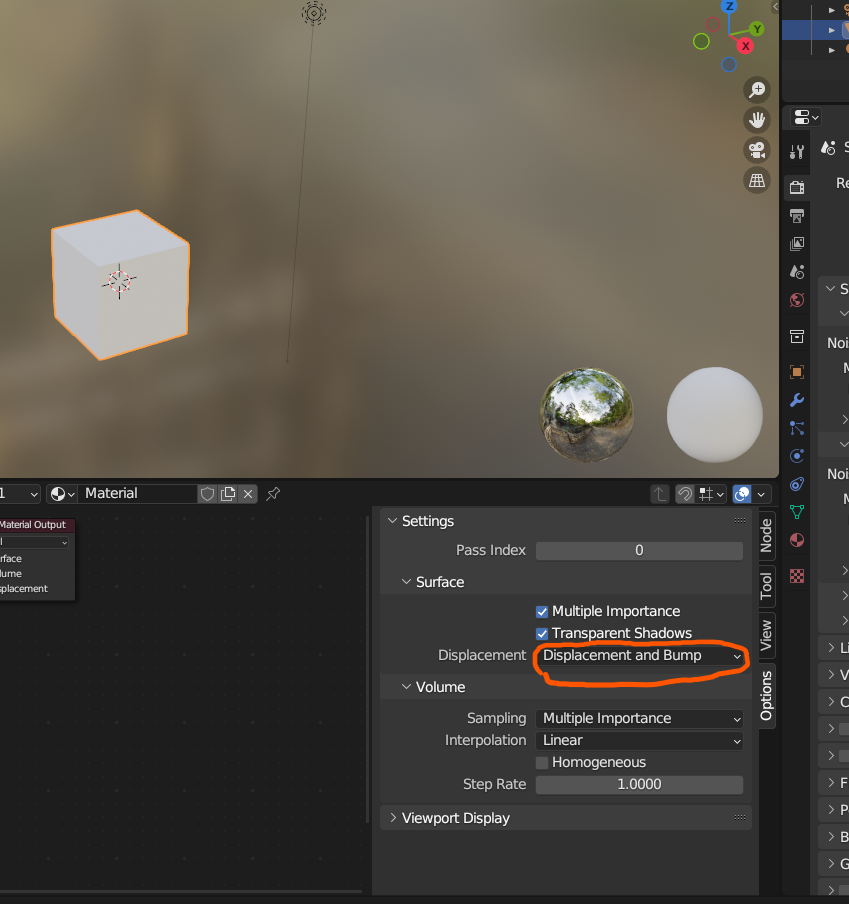
Each material has a displacement map that allows you to adjust the effect of the thickness and thickness curves of the material. This function is visible only when using the Cycles rendering engine and when the ‘displacement’ entry in the shader editor is set to ‘Displacement and Bump’, as shown in the following image:

Although the displacement map of each material is already preset to achieve the best results, you can modify it at will according to your needs, even to create special or unusual effects.
To maintain a high realism of the fabric, it is recommended not to use high displacement map values, but between 0 and 0.150 in the ‘scale’ value. However, each material reacts differently to values, so in some cases higher values may be appropriate, in other cases less.
In this case, you are free to experiment with different values.
To vary the intensity and appearance of the displacement, you can modify the values of the two bars ‘Displace Scale’ and ‘Displace MidLevel’.
Dynamic reflection allows you to modify the way light reflection on the material surface is simulated, based on the position of the light relative to the camera position.
In this case too, the values are generally set for the best quality of the effect. However, by varying the respective 4 values, you can create dynamic light and dark effects on light reflection, very particular, to simulate different qualities of more shiny and reflective yarn like silk, or less like cotton and wool.
You are free to experiment with various combinations of values to achieve even particular effects.
To modify this parameter, there are 4 bars named ‘Dynamic Reflection 1’, ‘Dynamic Reflection 2’, ‘Dynamic Reflection 3’, ‘Dynamic Reflection 4’
Texture POSITION (pattern)
In each material, you can modify the position of the design by changing the LOCATION values for X, Y, Z coordinates.
Please note: the modification of the Z value only works if a rotation value modification (i.e., greater or less than zero) is active for at least one of the X, Y, Z coordinates.
To make this shift, you need to modify the values of the bar named ‘Surface Location’, which by default is set to 0.000 in all coordinates.
Each material offers the possibility to modify the rotation of the design by changing the ROTATION values for X, Y, and Z coordinates.
NOTE: The rotation in X and Y also allows a deformation of the design, allowing you to create different design effects, even very different ones, in a few seconds. The greater the rotation value, the greater the deformation.
The rotation in Z rotates on the texture axis without deformation. Therefore, to correctly rotate the texture, it is sufficient to use the modification of the Z value.
To vary this value, you can use the bar named ‘Surface Rotation’. By default, all 3 coordinates are set to 0.000
Texture SCALING (pattern)
Each material can be customized by adjusting the scale of the design. This can be done by adjusting the SCALE values for the X and Y coordinates. Please note that there will be no changes if you modify the Z value.
To maintain the proportions of the fabric or material design, it is necessary to enter values that maintain the original proportions that we have set by default, otherwise the scale will change, deforming the design. If different values are used, the dimensions will change based on the selected coordinate.
IMPORTANT: It is recommended to adjust the scale (zoom) of the material by modifying these values, rather than changing the UV mapping, to avoid conflicts with the original scale.
To adjust the scale values, you can modify the values in the bar called “Surface Scale”. By default, these values are set to provide a more realistic representation of the fabric on 3D objects correctly proportioned relative to their real dimensions
Fabric pattern DEFORMATION
By adjusting the rotation values in X and Y and changing the scale of the textures in a non-proportional way, it is possible to deform and modify the material design, thus creating new designs that can be very different from the original one.
This feature adds even more customization variety to each material, recreating new design forms using your own imagination.
Deformation can be performed on any material, although it is particularly recommended for fabrics with geometric or fantasy designs, as other types of designs, such as floral ones, could produce very strange results and perhaps not suitable for fabric design characteristics.
However, for each material in the archive, 6 types of deformations have already been created per fabric code for immediate use
---
COMPATIBILITY
DT-00007 - HR Fabric Materials PRO42 has been designed for Blender 3.0 and later versions. Although it is theoretically compatible with not too old previous versions, we cannot guarantee full compatibility with these versions of Blender.
Please note that, to achieve the best results in terms of realism, we recommend using the “Cycles” rendering engine. However, all materials can also be used with “Eevee”.
IMPORTANT: When using the “Eevee” engine, to avoid an unnatural effect of light/dark colors based on the distance from the camera, it is recommended to zero all “Dynamic Reflection” values. These have been designed for optimal use only with the “Cycles” engine.
IMPORTANT TO KNOW
To use materials in any Blender project, you must import them via the Append option, from original DT-00007 - HR Fabric Materials PRO42 project.
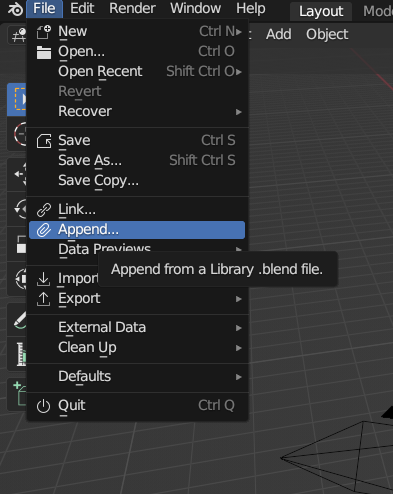
The Append option is in the file menu as shown in the image below

The Append option is in the file menu as shown in the image below


