Carvature - Procedural Wood Texture
How to
To open and test included .blend file please use Blender version 2.80.
However, to use the Carvature node or any selected materials you can use earlier version of Blender as well (tested on 2.79 and 2.80).
To add Carvature to your project:
- File → Append (Shift+F1).
- Navigate and select Carvature.blend.
- a) Select NodeTree → Carvature if you want to build your pattern from scratch,
b) select Materials → any included material if you prefer to use a prepared material. - Use Node Editor (2.79) or Shader Editor (2.80) to create or modify a material.
Once you opened your new file, please follow the description below to fully understand how it works.
Some of the paragraphs are intentionally omitted to avoid repetiveness, some of them are just self-explanatory.
Texture
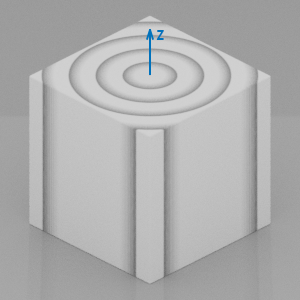
The texture by default is based on the object's Z-Axis, which is surrounded by growth rings infinitely.  Carvature template applied to the default cube
Ring (growth ring, annual ring) - a layer of wood formed during one growing season
Latewood (summer wood) - darker part of ring formed during late part of growing season
Earlywood (spring wood) - lighter part of ring formed during early part of growing season
Heartwood - dead, central part of wood, usually darker color
Input
Scale
Rings Density
Noise
Main deformation.
Noise Distortion
Deformation detail.
Stretch
Stretch deformation along the z-axis.
Color1
Background color
Color2
Details color
Color Saturation
Color Value
Rings Color
Interpolation between Color1 and Color2
Latewood Color
Latewood Range
Latewood coverage across the ring.
Latewood Scale
Diameter of latewood cells - higher scale means smaller diameter.
Earlywood Color
Earlywood Scale
Rays Color
Rays Radiance
Type of rays projection within texture. In real life rays come out from center outside (value 1), but for CG purpose there is an option to show just surface part of 'ray' (value 0).
Rays Scale
Density of rays. Higher scale means more dense, but smaller rays.
Rays Range
Coverage or size of rays.
Rays Sharpness
Heartwood Color
Heartwood Range
Heartwood Smoothness
Bumpiness Strength
General texture bumpiness strength. By default darker areas mean lower height.
Rings Bumpiness
Latewood Bumpiness
Earlywood Bumpiness
Rays Bumpiness
Knots Density
The density of knots, keep in mind the higher density decreases knots' size.
Knots Size
Diameter of knots.
Knots Depth
Density of rings within knot.
Knots Env Size
Knots Envelope Size - area around the knot. Value 2 means the envelope size is about 2 times higher than knot size.
Knots Env Depth
Knots Envelope Depth - area around the knot. Value 0.5 means the density of rings within envelope is about 2 times lower than within knot.
Knots Deform
Value 0 means round knots, value 1 means maximum deformation.
X-Offset
Y-Offset
Z-Offset
Infinite Z-Offset. Use the slider to find perfect pattern.
For multiple objects using same mesh, plug the Object Info's Random value to add variety (example in the Chess scene).
X-Slice Width
Divide texture along x-axis (example in Board scene).
Value 0 - slicing disabled.
Value 1 - slices are 2 units wide (main panel starts on x = -1 and ends on x = 1)
X-Slice Z-Offset
Add variety to created slices (example in Board scene).
Value 0 - all slices look the same.
Value 1 - every next slice is moved 1 slice width value.
Y-Slice Width
Y-Slice Z-Offset
Cells Length
R - Latewood
G - Earlywood
B - Rays
Value 0 - dot size.
Value 1 - infinite length.
Vector
Texture Coordinate input.
The most commonly used coordinate is Object, but other options are also possible depending on the user's needs, however, some Mapping Node adjustments may be necessary.
Output
Color
Color output to your shader.
Knots
Knots factor. Use with Color Ramp node and mix with Color output to make knots darker (example in Pallet scene).
Normal
Normal output to your shader.
Vector
Texture coordinates including Scale, Slices and Offset. Plug into additional textures for more accurate blending with Carvature texture.